Shockingly Simple Crème Brûlée: Your 6-Ingredient Guide to Dessert Perfection
Imagine a dessert that whispers luxury, a symphony of textures that melts in your mouth, yet requires only a handful of everyday ingredients and surprisingly little fuss. For too long, crème brûlée has held an intimidating reputation, confined to the menus of high-end restaurants and the repertoires of professional pastry chefs. But what if we told you that creating this masterpiece in your own kitchen is not only achievable but shockingly simple? Get ready to shatter misconceptions and crack through the crisp, caramelized sugar topping of your very own homemade crème brûlée.
This comprehensive guide will demystify the art of crème brûlée, proving that you don't need extensive culinary training to achieve a dessert that looks and tastes like a million dollars. With just six core ingredients and a few straightforward steps, you're about to unlock the secret to the silkiest custard and that iconic crunchy topping. Prepare to impress your guests, treat your loved ones, or simply indulge in a moment of pure bliss with a dessert that's truly extraordinary yet unbelievably accessible.
Unlocking the Secret: Why Crème Brûlée is Easier Than You Think
The allure of crème brûlée often comes with a hefty price tag and a perception of complexity. Many home bakers shy away, fearing elaborate techniques or exotic ingredients. However, the reality couldn't be further from the truth. The fundamental beauty of crème brûlée lies in its simplicity – a delicate balance of fat, sugar, and eggs, transformed through gentle heat into an exquisite custard. This isn't a dessert that demands hours of intricate work; rather, it’s about understanding a few key principles and having patience.
The "shockingly easy" aspect of crème brûlée is a delightful revelation for those who've dreamed of recreating that restaurant experience at home. It’s a perfect dessert for any occasion, from a romantic Valentine's Day dinner to a celebratory Mother's Day brunch, or even just a cozy night in. The process involves basic kitchen techniques you might already be familiar with, such as whisking and gentle heating. The magic truly happens when these simple steps combine to create something truly spectacular. Forget the fancy dining room; your kitchen is about to become the best dessert spot in town.
Your 6 Essential Ingredients for Perfect Crème Brûlée
At its heart, classic crème brûlée relies on a minimal yet mighty cast of characters. The quality of these ingredients plays a significant role in the final luxurious outcome. Here are the stars of our show:
- Heavy Cream: This is the backbone of your custard, providing unparalleled richness and a velvety texture. Look for heavy cream (or heavy whipping cream) with at least 36% milk fat. Do not substitute with half-and-half or milk, as it will result in a much thinner, less satisfying custard. Three cups of heavy cream, combined with the right amount of egg yolks, creates that perfectly lush consistency.
- Egg Yolks: The magic makers! Egg yolks are responsible for thickening the custard and imparting its signature creamy texture and pale yellow hue. For 3 cups of heavy cream, a ratio of 4-5 extra-large egg yolks (plus sometimes 1 extra whole egg for stability, as seen in some traditional recipes like Ina Garten's) is ideal for an incredibly smooth and rich crème brûlée. Save those egg whites for an omelet or meringue!
- Granulated Sugar: You'll need sugar for two distinct purposes. Half a cup will sweeten the custard itself, while an additional tablespoon per serving is reserved for that iconic caramelized topping. Fine granulated sugar works best for both.
- Pure Vanilla Extract: The soul of a classic crème brûlée. Opt for high-quality pure vanilla extract or, for an even more exquisite aroma, use vanilla bean paste or scrape seeds from a fresh vanilla bean. The warm, inviting notes of vanilla are essential to the dessert's character.
- A Pinch of Salt: While often overlooked, a tiny pinch of salt in the custard beautifully balances the sweetness and enhances all the other flavors, preventing the dessert from tasting flat.
- Your Signature Sixth Ingredient (Optional, but Highly Recommended): This is where you can personalize your crème brûlée and elevate it beyond the basic.
- Orange Liqueur (e.g., Grand Marnier): A tablespoon of orange liqueur introduces a subtle, sophisticated citrus note that beautifully complements the rich cream and vanilla. It adds a layer of complexity without overpowering the dish.
- Espresso Powder: For coffee lovers, a teaspoon of fine espresso powder (found in the coffee aisle) can transform your crème brûlée into a decadent coffee-flavored treat. It deepens the flavor profile without making it taste overtly like coffee; instead, it enhances the richness.
Step-by-Step Guide: Crafting Your Dreamy Custard
Creating the perfect crème brûlée custard is all about gentle handling and controlled heat. Follow these steps for success:
1. Preheat & Prep Your Station
Begin by preheating your oven to a precise 300°F (150°C). This low and slow temperature is crucial for a perfectly set custard. Arrange 6 to 8-ounce ramekins in a sturdy baking pan (such as a roasting pan or a 9x13-inch pan) with high sides. You'll be creating a water bath, so ensure the pan can comfortably hold the ramekins with space around them.
2. The Cream Base: Scalding for Success
In a small saucepan, combine your heavy cream and that pinch of salt. Heat over medium-low heat until the cream is very hot to the touch, just shimmering, and small bubbles form around the edges – but do not let it boil. Scalding the cream helps infuse flavors (like vanilla if you're using a bean) and prevents the custard from curdling later. Once scalded, remove from heat and stir in your pure vanilla extract and your chosen optional sixth ingredient (orange liqueur or espresso powder).
3. The Egg & Sugar Blend: Gentle Whisking is Key
In the bowl of an electric mixer (or a large bowl with a hand whisk), combine your egg (if using a whole egg) and egg yolks with ½ cup of sugar. Mix on low speed, or whisk gently by hand, until just combined and pale yellow. Be careful not to incorporate too much air, as excessive bubbles can lead to a frothy or grainy custard.
4. Tempering: The Crucial Bridge
This step is vital to prevent your eggs from scrambling. With the mixer on low speed, or while whisking constantly by hand, slowly and gradually pour about a third of the warm cream mixture into the egg mixture. This process, called tempering, slowly brings the eggs up to temperature. Once tempered, slowly add the remaining warm cream mixture, whisking until fully incorporated. The custard base should be smooth and liquid.
5. Pouring & The Water Bath
Carefully pour the custard mixture into your prepared ramekins, filling them almost to the top. Next, carefully pour boiling water into the baking pan, ensuring it comes halfway up the sides of the ramekins. The water bath (bain-marie) creates a gentle, moist, and even cooking environment, preventing the custards from curdling or developing cracks.
6. The Gentle Bake & Chill
Bake for 35 to 40 minutes, or until the edges of the custards are set, but the centers still have a slight jiggle when gently shaken. Overbaking will result in a rubbery texture, so err on the side of underbaking if unsure. Carefully remove the ramekins from the water bath (using tongs is helpful), let them cool completely to room temperature on a wire rack, then cover them with plastic wrap and refrigerate for at least 4 hours, or ideally, overnight. Chilling overnight allows the creme brulee to fully set and develop its luxurious, velvety texture, making it an awesome make-ahead dessert!
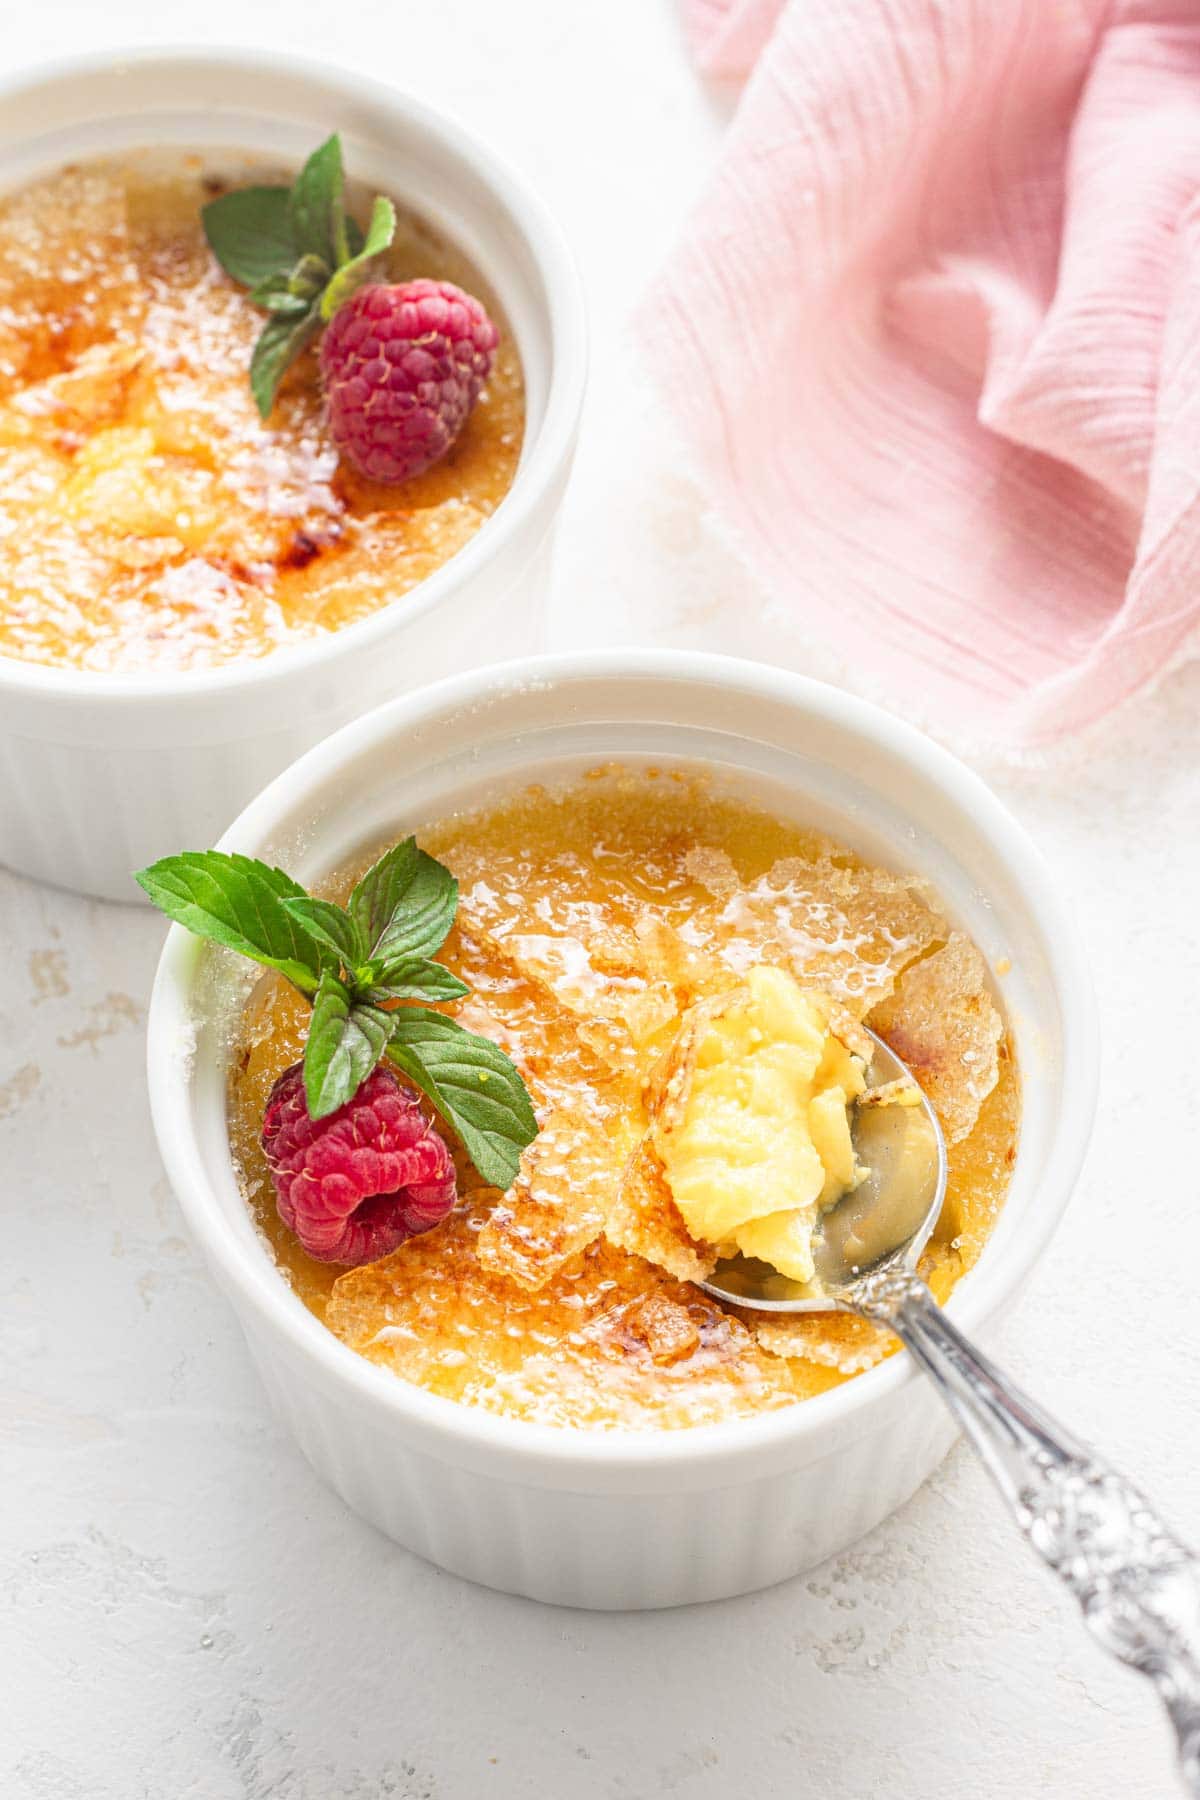
The Grand Finale: Achieving That Iconic Caramelized Top
This is where the magic happens and your crème brûlée transforms into its iconic self. The contrast between the cold, creamy custard and the hot, brittle sugar shell is what sets this dessert apart.
- Sugar the Top: Just before serving, remove the chilled ramekins from the refrigerator. Evenly spread about 1 tablespoon of granulated sugar over the top of each custard. Don't be shy, but ensure an even layer for consistent caramelization.
- The Torch Method (Recommended): The most satisfying and traditional way is to use a kitchen blowtorch. Hold the torch about 2-3 inches above the sugar and move it in a circular motion. Watch closely as the sugar melts, bubbles, and turns a beautiful amber color. Continue until the entire surface is caramelized. This method offers the most control and prevents the custard from warming up too much.
- The Broiler Method (Alternative): If you don't have a kitchen torch, preheat your broiler to high. Place the sugared ramekins on a baking sheet on the top rack, about 4-6 inches from the heat. Broil for 1-3 minutes, watching constantly! Sugar burns quickly, so do not walk away. As soon as the sugar is caramelized, remove from the oven. This method heats the custard more, so serve immediately.
Allow the caramelized sugar to sit at room temperature for a minute or two until it hardens into a crisp, glassy shell. Then, serve immediately and enjoy the satisfying crack!
Tips for Crème Brûlée Perfection & Flavor Adventures
- Ingredient Quality Matters: Since there are so few ingredients, the quality of each shines through. Use fresh, high-quality heavy cream and pure vanilla for the best results.
- Avoid Over-Whisking: When mixing the eggs and sugar, and when tempering the cream, gentle whisking is key. Too much air can create a foamy texture or tiny air pockets in your finished custard. If you notice a lot of foam, skim it off before pouring into ramekins.
- Don't Skip the Chill: Patience truly pays off here. A well-chilled custard is firmer, creamier, and provides the essential temperature contrast for that perfect warm sugar crust.
- Troubleshooting Granular Custard: If your custard turns out grainy, it's often due to overbaking or cooking the eggs too quickly (improper tempering). Ensure your oven temperature is accurate and that you temper slowly.
- Experiment with Flavors: While vanilla and orange liqueur are divine, crème brûlée is a fantastic canvas for other flavors. Consider infusing your cream with lavender, cinnamon sticks, cardamom, citrus zest (lemon, lime, grapefruit), or even a touch of high-quality chocolate. For a unique twist, try adding a few drops of almond extract or a different liqueur like Kahlúa or rum.
- Storage: Un-caramelized crème brûlée custards can be stored, covered, in the refrigerator for up to 3-4 days. Caramelize the sugar just before serving for the best experience.
There you have it – the seemingly complex world of crème brûlée demystified into a simple, six-ingredient journey to dessert perfection. The joy of cracking through that caramelized sugar to reveal the silky, vanilla-scented custard beneath is an experience that truly defines luxury. Now armed with this guide, you have everything you need to bake this classic dessert with confidence and flair. So go ahead, gather your ingredients, fire up that torch, and prepare to delight your senses with your very own, shockingly simple, homemade crème brûlée.
